
If you use Shopify as your e-commerce platform, then you will need to know all the latest updates regarding the platform. Now, you can give access to the POS app with a QR code, view cash activity across all registers at every POS Pro location, and view the Shopify Retail Kit (to scale!) in your own store in augmented reality. And if you need help with your Shopify, contact SEO Design Chicago today to learn about our Shopify optimization services.

Table of Contents
Shopify Updates
If you are one of Shopify’s million users, these are the details on the latest updates in Shopify that should make using Shopify even easier for your team. Please note, however, that you will need Shopify POS Pro to utilize many of the new features. (There are multiple versions of Shopify that you can use for your business, as well as several different Shopify apps.)
QR Code Logins for POS Pro
Normally, before you can use Shopify POS to process sales, a Point of Sale staff member has to log in to the app with an admin username and password. However, now, you can generate a QR code so that POS staff members who do not have admin credentials can open the Shopify POS app login on a single device at a specific location with their PIN. In order to generate a QR code, you need to be assigned a role that has all the admin permissions allowed. However, it is important to note that this feature is only available for merchants who are using Shopify POS Pro.
How to Generate a QR Code
Be sure to verify the following two things before you generate a QR code:
- The POS-only staff member has a POS Pin
- The location has a POS Pro subscription
Steps to Generate a QR Code:
- From the Shopify Admin, go to the Sales Channel section, then click Point of Sale > Locations.
- Choose the location for which you want to generate the code.
- Click “Set up QR code login.”
- Under Email QR code, search for the Point of Sale staff member who you want to send the code, then click Email QR code.
- (Optional Tip: If you need a staff member to log in to multiple devices at the same location, or if the code has expired, simply click “Generate new QR code.” It won’t change previous codes, and they will still be valid.)
How to Log in Using a QR Code
- On the Shopify POS login screen, tap “Log in with QR code.”
- Use your device’s camera to scan the QR code.
Tip: If you can’t scan the QR code for whatever reason, tap Use URL, enter the URL, then tap Next.
![]()
Retail Cash Tracking Reports in Admin Pro
You can simply view your end-of-the-month reconciliation by using a complete view of your cash activity across all registers at every POS Pro location from the Shopify admin.
In order to view your cash tracking sessions from the admin, just click Point of Sale > Overview > Cash tracking sessions. If you want to narrow down the information, you can choose a location and a date range. You can also click Export to export all the selected information into a CSV file.
However, it is important to note that staff members must have the “View cash tracking sessions (Cash tracking history)” permission enabled in order for you to view the cash tracking information. If you want to restrict access to the register settings, enable the “Limited permissions” option in the Staff Settings.
How to Enable or Disable Tracking Sessions
- From Shopify POS, tap = > Settings > Payment settings.
- Next, tap Cash.
- Tap the toggle button to enable or disable Track Cash.
Discrepancy Summary
Keep a closer eye on your cash with Shopify’s Discrepancy Summary. The Discrepancy Summary is an overview of expected amounts of cash and what was actually counted for all sessions that happened at your selected location within the time range you choose. A discrepancy occurs when there is a difference between the expected and counted amounts of cash.
The “Discrepancy at Start” shows you the amount that was reported at the end of the last session and the amount counted at the beginning of the session. The “Discrepancy at the end” shows you the expected amount in the cash drawer by adding the amount counted at the start and the cash payments that were received throughout a session. It then compares them to the amount counted when ending a session.
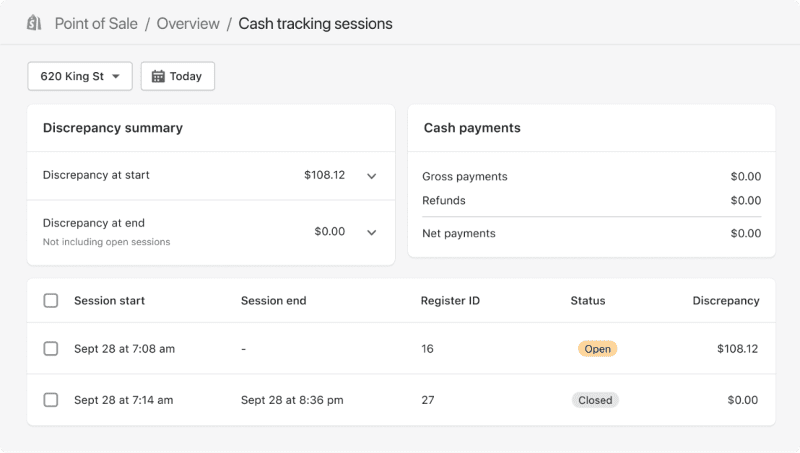
Cash Payments Summary
The Cash Payments Summary shows you the overview of the cash payments for all sessions that occurred at your selected location within the time range you choose. The “Gross Payments” amount shows the total amount of cash payments processed. The “Refunds” amount shows the total amount of refunds processed. In order to get the Net Payments amount, the refund is subtracted from the gross payments amount.
Session List
The Session list shows the sessions that occurred at the selected location within the time range. Each row is a single session and displays the session start and end time, Register ID, Open or Closed status, and total discrepancy that is associated with the session. Simply click the column headers to sort the session list by session start, session end, or total discrepancy.
Cash Tracking From the Shopify POS App
The Register screen in the Shopify POS app allows you to create and review tracking sessions for your store. Monitor your daily transactions and any adjustments made by staff. Once you begin a tracking session, you can also monitor sales with other payment types, like credit cards. If you don’t recognize Shopify POS, you might still be using Shopify POS Classic.
How to Start a New Tracking Session
There are two ways you can create a Shopify POS tracking session. First, you can do so manually. You will want to start a new tracking session manually if you want to specify the initial cash float for the tracking session. (The cash float is how much money is initially provided in the cash drawer so that staff can make changes for customers.) Or, you can start a new tracking session automatically. You will choose automatically if you want Shopify to use the expected cash sum in the cash drawer as the float for the next register shift.
How to Open a Tracking Session Manually
If you create a new tracking session manually, enter a value for your cash float.
- From Shopify POS, tap > Register.
- Next, Tap “Start tracking session.” A dialog will open.
- Type the float or start amount. If you want, you can enter a note.
- Tap Confirm. The tracking session will stay open until you close it manually.
Tip: Keep in mind that you can only have one tracking session open at a time on each device.
How to Open a Tracking Session Automatically
If you close a tracking session and you don’t open another before processing the next order, Shopify will open a new tracking session automatically. The calculated cash balance at the close of the previous tracking session is used as the float or opening amount. If it’s the first tracking session for your store, the float amount is set automatically to $0.
How to View Tracking Session Details
The way you track a session depends on whether you are looking at an open or closed cash tracking session.
You will always see this information:
- The date of the shift
- The total sales for the shift
- Your initial float amount
- The name of the staff member(s) who opened the shift
- Any changes the staff made to the amount of cash in the drawer. (For example, if they used some of their own cash to make a change.)
If the session is closed, you will see some different information:
- The name of the staff member(s) who closed the session
- The amount of cash counted at the end of the session
- Sales by each payment type
- Amount of cash in the drawer that was expected when the session was closed
- Amount of cash left in the float after you perform the final balance of the cash drawer
How to View the Open Tracking Session
- From Shopify POS, tap > Register.
- Tap “View Open Session.”
How to View the History of a Closed Tracking Session
- From Shopify POS, tap > Register.
- Tap Session history.
- Next, tap the tracking session you want to see.
- Optional: Tap “View payment types” to see a breakdown of the various payment types used in the session. Or, you can tap “Print page” to print the payment type information.
How to Adjust the Float
A register float adjustment is when you add or remove cash to the register. Some reasons you might adjust the float are:
- If staff can’t make the correct change with the cash in the drawer
- The cash in the drawer has exceeded your preferred limit
- Staff needs to remove cash from the drawer temporarily
Steps to Adjust the Float:
- From Shopify POS, tap > Register.
- Then, tap View open session.
- Tap either Add or Remove, depending on which you need to do.
- Enter the amount of cash added or removed. You can add a note if you’d like.
- Click confirm.
Any adjustments to the register will appear in the register history on the Register screen.
Closing a Cash Tracking Session
If you want to balance your cash drawer correctly, then you should close tracking sessions at regular intervals. For example, you could do it at the end of each day or each time a shift ends.
When you close a tracking session, the following info will be added to the session history:
- How much cash was counted at the end of the session
- The expected value of the cash in the drawer
- The cash left for the float after you perform the final balance of the cash drawer and remove the day’s takings
- Sales by payment type
How to Close a Tracking Session
- From Shopify POS, tap > Register.
- Tap View open session.
- Then, tap End tracking session.
- Type the amount of cash in the cash drawer, then tap Next.
- Review the totals on your Cash Summary page and tap Next again. (Tip: If the totals on your Cash Summary page don’t match, you can adjust the amount counted by tapping Back.)
- Choose an amount to leave in the cash drawer and tap Next.
- Confirm how much cash you want to take from the register, and tap Confirm.
- Review the tracking session summary.
- Optional: You can print the cash details for the tracking session by tapping Print. If you want to print a summary that includes all payment types, you will need to look at the session’s history.
- Tap done!
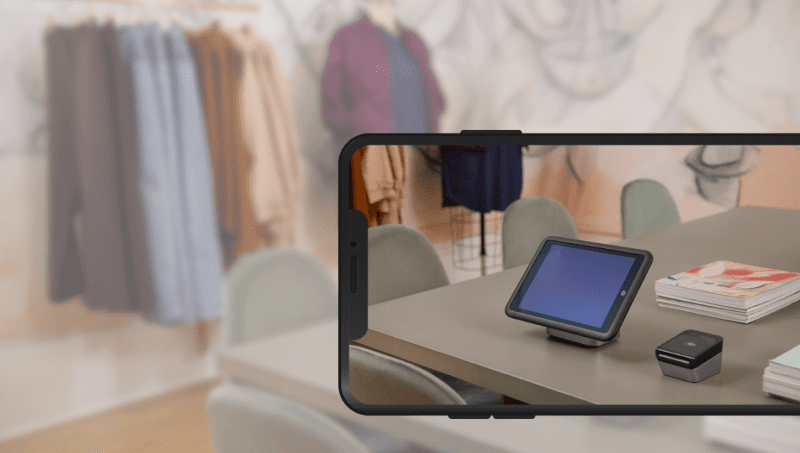
The Shopify Kit in Augmented Reality
If you want to visualize Shopify’s hardware at your very own checkout counter, you can do so in augmented reality. Click the link on your smartphone to view the kit (to scale) in your own space. There are Shopify retail kits available for both 9.7” and 10.2” iPads.
Get Help With Your Shopify With SEO Design Chicago
SEO Design Chicago provides Shopify web development services. You can optimize your Shopify to get more clients with our help.
FAQs:
- What’s new with Shopify?
- How to open a cash tracking session in Shopify?
- How to generate a QR code login for Shopify?
- What size of Shopify retail kits are available?
- How do I adjust the cash float in Shopify?
Contact Us Today!